Showing posts with label photography. Show all posts

Saturday, November 30, 2013

Bonsai Rock Graffiti Cleanup

Bonsai rock is one of Lake Tahoe's most famous photography sites Full cleanup gallery  
Famous Lake Tahoe photography site Bonsai Rock got tagged with about 50 sprayed on graffiti over Labor Day weekend 2013.  I went out to a graffiti cleanup event at Bonsai beach organized by Dylan Eichenberg and People of Tahoe, Inc.


As Dylan Eichenberg said: "I've been helping to organize this graffiti cleanup effort.  I first saw the pictures two weeks ago, and I came down to the beach because a good friend of mine, Cody Lieberman with People of Tahoe company organized the first graffiti beach cleanup.  We decided that day that we couldn't really do as much as we wanted to, so we decided that we really needed to take some action and get the community together to clean up this unique area.

So, what we did is that first we talked to the state parks, the League to Save Lake Tahoe, the US Forest service, the TRPA, and a bunch of important organizations at Lake Tahoe that deal with environmental cleanup; and we decided that, you know, this is something that we could totally take on. We're trying to get as much of this graffitti as possible.  They've tagged over 50 rocks out there.  You may have seen the pictures on Facebook, and they don't even come close to what's out there.  So, it's gonna take a lot of us and we're gonna get it, hopefully, pretty much done today.  State parks won't be able to get it until July so what we're doing here is really gonna make a big difference."


We worked hard scrubbing all day with wire brushes, blowtorches, and graffiti remover.  The rock I was scrubbing was so thick with paint there were archeological layers: scrape off the silver and there's black underneath, scrape off the black and there's blue and gold underneath... Despite two people scrubbing, I never did get all the way down to bedrock on the rock pictured above.  Luckily most of the rocks weren't as heavily covered as this one as you can see:

Photos from the Adopt Bonsai Beach group

Graffiti before

After cleanup

Regarding the cleanup product, Cody Liberman, co-owner of People of Tahoe said: 

"The product we've been using out here is this product called Motsenbocker's Lift Off.  It's actually an environmentally friendly based cleanup.  It's a solution that breaks down spraypaint as well as cleaning it up, but it's still environmentally friendly.  You know, it doesn't polute the lake, it's not harmfull, and so far it's been the only solution.  We've tried many things, we've done scrub brushed, we've taken torches to try to change the effect of the paint and nothing has worked as well.  


So, we're out here, we've got a bunch of people we've gathered up.  The pictures have gone viral, and, like I've said you can see behind us that we're cleaning up, and it's everywhere.  

And I'm with People of Tahoe.  I'm the owner, I'm the co-owner and we've contributed a bunch of stuff.  You know,we've brought a bunch of stuff and we've reached out to Meeks Hardware in South Lake Tahoe and they've donated all kinds of Motsenbocker product that's cleaning up for us.  Truckee hardware as well as Incline has donated Motsenbocker as well as buckets and brushes.  We actually had a local Safeway that's donated some food out here for us.  And, y'know, we've reached out and tried hard and we've spent some money on the company, with the company money and it's worked out.  We're just reaching out and trying to get a good cause going."


The graffiti has been particularly rough on local photography tourisim.  "Bonsai beach is one of the main places that photographers come to Lake Tahoe to make their images." said North Tahoe area photographer Martin Gollery   "This is a well known and famous and well loves area for Lake Tahoe area photographers, and this is one of the places where we bring people when other photographers come from elsewhere to visit Lake Tahoe and want to see a special location.  And so, for us as photographers, this has been a real travesty because it spoils our images and it spoils what we want to show to people that visit."

My Message to Potential Taggers:

And finally, a message for those of you who are aspiring graffiti artists.  Though it is terrible to do graffitti on nature, there is a place for graffiti in society and if you are a grafitti artist in the Lake Tahoe area there is a great non-profit called Sphere of Influence.  (Contact them on facebook) Sphere of Influence can find you legit places to put up your art where you can do graffiti and get away with it and know that your art is going to be standing for years and years with nobody scrubbing it off.  So, PLEASE, graffiti artists, don't tag on nature.  Perfect your art on plywood at home and then call Sphere of Influence and they will give you a lightbox to decorate the way you want. It's really cool.

By the way,  We really do have a good street art scene in South Lake Tahoe.  Don't let the Bonsai rock graffiti fool you, graffiti can be right in the right places. Check out my interactive walking tour of South Lake Tahoe Street Art to see some of the legit art you can see there.


Thursday, June 20, 2013

How to Photograph Fireworks on 4th of July

 4th of July is coming up and everybody's been asking me: "How do you photograph fireworks?"


Equipment

Well, first of all, you have to make sure that your camera is capable of photographing fireworks. You guys know me, you know that I take most all of my photography with my camera phone, but, let me tell you, a camera phone is not sufficient to photograph fireworks. To be able to photograph fireworks you don't necessarily need an expensive SLR like the one I have in the video, but you do need a camera that has a good manual mode where you can set both the aperature and the shutter together.

Now, to be able to film fireworks effectively, you're going to need a tripod. Your first and most primary piece of equipment is a tripod. You can get them for about $20 at Amazon, you can get nicer ones more expensively. You want to make sure that your tipod is in a good position with a good view of where the fireworks are going to be. You want to be up against the rail if you can be. Either that or be way in the back up a hill where you're going to be over top of people's heads.

You set up your tripod there and make sure your tripod is nice and level. Figure out where the fireworks are going to be shot off from and point your camera that way. Like, in Tahoe we shoot off our fireworks from Nevada Beach so I'm pointint my camera towards Nevada Beach. You square up a nice, level shot of where the fireworks are and zoom in so that the fireworks area is framed nicely in your camera.


Camera Settings:

Now you want to set your camera to manual mode. Set your aperature to f8, set your ISO to 200, and then you want to be varying your shutter speed as you take the pictures. Now, how long your shutter speed goes for is going to determine what your picture looks like. If you do a shutter speed of half a second that's going to capture one, or maybe a couple of bursts of fireworks in a nice clear single frame. If you extend your exposure to 1 second, 2 seconds, all the way up to 5 seconds (you may need to stop down to a smaller aperature if you're filming for 5 seconds); you're going to get more and more bursts of fireworks in any single frame.


So, if you're looking to get a bunch of fireworks like the climax of a fireworks display, go with a 3-5 second exposure with an aperature of f10-14;


if you want to get a single firework or a couple of fireworks go with a half second exposure with an aperature of f8.

Make sure that you either have a cable relase, or if you are doing it just with the camera's shutter button that you push your camera button quickly and release it as quickly as you can because if your hand shakes while it's on the button you're going to ruin whichever picture you're taking. Take lots of pictures over the course of the fireworks display. You can adjust your zoom to zoom out to get a large shot, say if the fireworks are high; or you can zoom in to just a single firework and take a quick exposure to get that single firework in the sky look.

Shooting Fireworks on Video

Now, if you're going to be filming video of fireworks, video can actually be a lot easier. Again, you need a good video camera to be able to shoot fireworks effectively. Most any consumer HD camcorder will work. Set the camera either to fireworks mode if it has a dedicated fireworks mode (check your camera manual) because if your camera has a dedicated fireworks mode that will do all the settings for you. Otherwise have your camcorder on night mode on a tripod and just set up your camcorder to look at the fireworks: set it, turn it on, run it for the whole fireworks display, turn it off at the end. Just make sure that nobody bumps your tripod, because, really, the best fireworks display on video is the one that doesn't have bumps in the middle that you have to take out.


If you want stills from your video, you can take your video into an editing suite like Adobe Premiere and capture stills: Just import the video into Premiere, put the video on the timeline, play through to the frame you want, pause, and click on the little camera icon under the editing screen.

They won't look as smooth as stills from an SLR, but you will at least be able to get nice clear stills, and because it's video you'll be able to choose what frame rather than have to put up with whatever your camera happened to capture when you were pressing the button.

Monday, May 14, 2012

Solar Eclipse in Tahoe May 20th

Tahoe is going to have a solar eclipse!


There will be an annular eclipse of the sun visible throughout the Reno/Tahoe region on May 20th, 2012According to Nevada Magazine the totality of the eclipse will last from 6:28 to 6:33 p.m local time in the regions with the longest totality. 

Though a partial eclipse will be visible across the region, Reno, Lake Tahoe, and Pyramid Lake are all directly in the path of the moon's shadow where all of the sun except for a small ring of light will be totally obscured.


Since this is an evening eclipse, the best observing sites will be places with a clear view to the west, like just about anywhere on the east shore of Lake Tahoe or Pyramid lake.  The amount of time the sun stays eclipsed will vary across the region depending on where you are.  It will last about 2:45 in South Lake Tahoe, 3:55 in Reno and Truckee, and a full 4:30 at the south end of Pyramid Lake where the 3-day Eclipse music festival has been organized arround the astronomical event.  Click here for detailed maps of exact times and durations of this eclipse from EclipseMaps.com.

SAFETY FIRST:

Remember, it's never wise to stare into the sun without protection! Even during the totality of a solar eclipse the part of the sun that is visible still puts out enough light to damage your retina after a few minutes.  You can protect yourself by buying an eclipse viewerr or set of eclipse glasses from Amazon.com or your local party supply store; if you have a set of welding goggles or a piece of smoked glass that will also offer adiquite protection. 

If you must observe an eclipse without proper protection, you can still get a decent view of what the sun is doing by looking DOWN.  Put a pinhole in a piece of paper or cardboard and use that pinhole to project an image of the sun's disc onto the ground, and then watch that: the light reflected off the ground is perfectly safe and the resulting image of the sun is much larger and more detailed than what you can see directly by looking up. (This also works for observing sunspots and the upcoming transit of Venus due June 5th.)


PHOTOGRAPHY:

Fair warning, photographing an eclipse is NOT an easy photography task. NEVER point your camera into the sun without a solar filter or you'll fry your CCD because the extreme brightness of the solar disc is just as hazardous to the sensor in your digital camera as it is to your eye. You can get a solar filter for $100-200 at your local camera store or from Amazon.com. -- (I've heard talk that a welding shield will also offer adiquite protection at a much lower price, but I can't confirm this so try it at your own risk only.)

If you want to successfully photograph an eclipse, you must use the manual mode of your camera with exactly the right camera settings and filters or you won't get a usable image.  (For full technical details, see Eclipse Chaser's excelent blog on "How to Photograph a Solar Eclipse")
My advice to the non-professional: Don't even bother trying to photograph the eclipse itself with a low resolution pocket camera or camera phone, all you'll get is a blurry dot and a fried sensor.  To get a good shot of an eclipse you need an SLR with a long telephoto lens and a good manual mode. 

If you don't have the skills and quality of camera to take pictures of the eclipse itself, focus on the crowds, the changing light in the surroundings, or your pinhole projection on the ground; or choose to just enjoy the event itself and save yourself the bother and just rely on the internet to serve you up plenty of pictures later.

Monday, February 20, 2012

How do I take better pictures with my camera-phone on vacation?

CAMERA PHONE PHOTOGRAPHY TIPS


A question I see a lot on the internet is: "How do I take better pictures with my camera-phone when I'm on vacation?" And, though I'd be the last person to tell you to go someplace like Lake Tahoe and NOT bring your good camera; it's still a really good question because great pictures often come up unexpectedly when your good camera is back in your travel bag at the hotel and the one and only shot you'll get at that moment is if you pull out your iPhone and snap a picture right there and then. 

Older camera-phone w/
too little resolution
Newer camera-phone
Right-click and open in new window to see full resoultion


It used to be that if you snapped a picture with your camera phone, you were stuck with a tiny, low quality image you couldn't do much with, but luckily for those of us who don't carry a pocket camera everywhere, just about all iPhones and most of the newer Android phones come with built-in high definition cameras that can actually take very good pictures if you know how to use them and pay a little attention to to the details of framing and composition. Check out my "How to Take Better Pictures with your Camera Phone" video on My YouTube channel

If you're looking for a phone that takes good pictures, do a little research online, don't just look at the specs on the website, type the model name of the phones you're interested in into YouTube and look at people's test videos and reviews (there are over 6000 results on my phone alone!) , that will give you a much better idea of which phones have decent cameras and which don't.  FYI: I took most of the pictures in this blog with a Samsung Galaxy S-II (See Pictures) which has proved far superior to the HTC Hero (See Pictures) I had before.

1. HAVE YOUR CAMERA READY

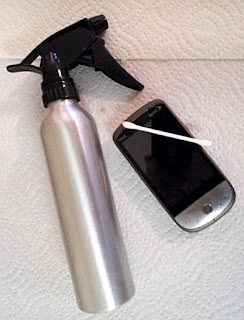
The single most common mistake I see in cell phone photography is that people often treat the camera as a secondary part of the phone and don't pay much attention to it:  I can't count the number of cell phone pictures I see ruined by a blocked camera or french-fry grease on the lens, or never taken in the first place because the person wasn't familiar with their camera or didn't have the space on the camera's internal drive.
If you want to take good pictures with the camera on your cell phone, you need to get in the habit of cleaning your screen and lens on a regular basis.  A soft paper towel or T-shirt with a few drops of rubbing alcohol will clean both your touch screen and lens safely, and if you make a habit of keeping them clean all the time, when the opportunity comes you won't have to lose time cleaning them off.


Be sure to keep enough space on the disc in your phone to accomodate a few hundered pictures at all times; hook up to your computer periodicly to offload old pictures and videos so you have enough space to take a picture when you want to, it's better to have one fewer song to listen to than not to be able to take a picture when you get the chance.

If you use a bumper or case for your cell phone, make a habit of checking with the camera to make sure the camera is not blocked at all.  Look around the edge of your screen and if you can see the edge of your case in the shot, you'll know the case isn't on right.  Likewise, be aware the camera's location on your phone, hold it by the edge and watch for your fingers to make sure they're not blocking the shot, and pay carefull attention to any other objects (like the mirror on your car door) to make sure they're not hanging in the shot. And if you must take pictures out the car window, make sure the window is down or at least clean! 

2. BEING IN THE RIGHT PLACE AT THE RIGHT TIME


You can only get the picture if you're in the right place at the right time.
Half of taking a good photograph is being in the right place at the right time:  A lot of us wander around in the world without really noticing what's going on around us, visually. The first step in taking a good picture is to realize that there's a picture there to be taken, and that only happens if you if you make a habit of noticing. 

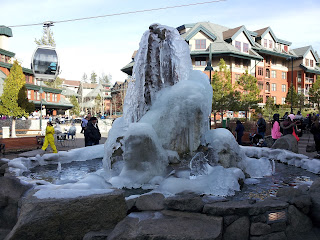
Keep your awareness open to the world around you, the buildings, the landscape, and the people.  Notice the details of things: the little flowers in the landscaping, the detail of the wood and stone...   Notice what's special about this particular moment in the world in front of you; the frozen fountain, the spring flower, the sky..


Notice how light plays with the landscape: how the shadows hang on the mountains in the morning, how the light plays off the facades of buildings in the afternoon, how the clouds in the sky refect off of still water. 


When you get in the habit of noticing, you will soon find that the world is chock full of stunning images that would make excelent photographs.  When you see a good picture in the world, don't be shy! Whip out your camera and take it.

3. VANTAGE POINT


When you see an opportunity for a picture in the world, spend a moment if you can choosing the best place to put your camera for that photograph. 
Three different angles, three different views


First, look around for safety's sake to make sure you're not gonna get hit by a car or fall off a cliff while you take your photograph, then when you're sure it's safe pull out your phone and open up the camera app; line up the screen of your cell phone so you're looking at what the lens is seeing, and then move around the spot to find a good place to take the shot.

Sometimes a few feet make all the difference!
OK vantage pointExcelent Vantage Point

Moving around in the scene changes your perspective on whatever it is you're looking at.  Different parts of the background will be visible or blocked, or shown in different relationships from different places to stand.  As you move notice whether the picture you see in your screen is getting better or worse.  Maybe you can see a little more lake in the background if you move a few feet to the right; or avoid having that graffittied up light-pole blocking your view of the beautiful building... You want a clear, unobstructed view of what you're looking at, with nothing ugly or distracting at the edge of the screen.  Camera phones take their best pictures up close, so if it's safe to do so get close enough so you can photograph without using the zoom if you can. 

A Dark and moody viewA Bright and Detailed View

Watch the light and mood changing as you move around searching for a vantage point, oftentimes a movine 60 or 180 degrees around an object gives you an entirely different mood.  Taking the pony express statue from the front in full sunlight emphasizes that it's a statue; taking it in shadow with zooming cars in the background emphasizes the action and makes it look as if it could ride off into the sunset right then and there.

4. COMPOSITION


Move around in the place looking at various angles of the thing you're photographing.  Look for a spot where the natural lines in the scene (paths, edges of buildings, tree branches, etc.) draw your eye from the edges of picture to a focal point, like where the skiiers are in this photo.

Use the edge of your phone to line it up so that the ground is level, and the buildings, trees, etc. are vertical; then tilt your phone slightly up and down so that the ground level is where you want it to be in the photo.  Especialy if there's water in your shot you don't want it to look like the buildings are falling over or the water is about to run out.


Look for a composition that obeys the "rule of thirds": Imagine a pair of lines 1/3 and 2/3 of the way across your picture in either direction, and try to line things up so that things align with those lines (for example: the bottom third of the photo is lake, the middle third mountains, and the top third sky; or putting the trunk of the pine tree at the 2/3 line for a more dynamic tree picture.)  If you are taking a picture of a person with a pretty background, they should be placed along the 1/3 line with the other 2/3 taken up with scenery.


Rule of 3rds

5. FRAMING

Once you've found the general angle and placement for your photograph, you should pause at the last moment to make sure the edge of your frame is OK.  Check that there are no fingers in the frame, and that the angle is, in fact, missing any ugly things in the vicinity that would spoil your photograph. If you need to use A LITTLE zoom at this point to make the composition work, go ahead and zoom a few percent in or out for the sake of having a better composition or getting something out of the edge of your shot.

If there's something pretty (like a pine bough or an arch) at the edge of your photograph that might make a good natural frame consider stepping back, zooming out, or angling up/down to include it. If you're not sure, just take the picture both ways and delete the version you like less.


6. DON'T BE AFRAID TO TAKE LOTS OF PICTURES

(and only share the good ones)


The difference between professionals and amateurs is that the professionals don't let you see their failures.  Don't be discouraged by the fact that not every picture is spectacular, even if you get really good at photography, only a small fraction of the pictures ever are.  Professional photographers take hundereds of pictures when we might take a few dozen, and then go carefully over all the variations and throw away the ones that don't work.  If you want a dozen good photos from your vacation, plan to take a hundered pictures while you're out there.

Luckily, on your camera phone the "film" is free and you can take all the pictures you want. Make a habit of looking at the pictures you've just taken and deleting any that are not worth keeping.  This will both keep your card free for more pictures on a long trip, prevent you from accidentally sharing anything you wouldn't want seen, and give you the valueable learning experience of noting to yourself why this or that photo didn't work out before you delete it.  Are you forgetting to focus?  Not noticing that the horizon / buildings aren't level? Also, if you check in the moment you may have the opportunity to replace a photo you're not happy with with another one that dosn't have the same problems.

Instant upload can be a great feature for sharing pictures; since you don't have to be at your computer to share to your social media; but please be selective about what you choose to post.  Only share a picture directly if that picture is perfect as it is and not in need of further work; or if the subject matter of the picture requires you to tweet it there and then for news purposes.  You should share the few best pictures from your phone each day either singly or in a gallery, but don't try to upload a gallery of more than 4-5 pictures from your cell phone or you'll wind up waiting a long time or maybe going over your data limit. If you're selective and only share the very best pictures, your followers will have a much better opinion of your photography skills. 

7. USE YOUR COMPUTER


OK, so you may not have a laptop with you when you're traveling; but when you get home, you should transfer all of the pictures in your phone to the computer.  This both gives you a chance to clear your card for the next time and makes sure that if your phone gets lost or damaged you still have your pictures on your computer.  Plus, your computer has image editing software that can make a lot of the mediocre pictures you took in the field better. 

Before and After Photoshop
BeforeAfter

For example, in this set we've cropped the ugly buildings out of bottom of the image and taken out some of the tree so that it's used as a framing element, instead of dominating.  We've also enhanced the red in the image to make the sunset more spectacular than it originally was and give more of a "purple mountains majesty" effect.

Removing obstructions
BeforeAfter


This pair illustrates the kind of thing you can only do on a computer; with a little digital magic, the lightpoles in the shot are completely removed by copying and pasting the background of the mountain over them. (It takes a little practice to get good at; but you can work wonders once you do!  Add a
purple filter and you get the example picture at the top of this blog.

Thursday, January 26, 2012

Nevada Beach and Khale Park in the snow


A walk through my favorite beach and park in the break between winter storms here in Tahoe, you can see the storm rolling in over the mountains of the west shore.


Probably the starkest picture I ever took w/ the ominous clouds and dead trees...